Showing posts with label easy DIY. Show all posts

Thursday, February 9, 2012

A foxy fable: Fur real or faux?

Do you have a little brother? I do. Sometimes we are the best of friends and sometimes we are at each other’s throats. Usually when we aren’t out to get each other, we go hunting. Or I go with him to check his traps. My bro is an intense trapper. It’s his ‘job’ he says. In truth he just likes to pet anything made of fur I think.

Packin' all his trapping gear

Lure doesn't smell that bad...

OKAY! Maybe it does...

He has tons of movies and books on trapping. Movies that even I’ve seen at least three times…that’s how much he watches them. And the only way to get him to read is if it’s a book on how to catch any little furry critter under the sun. One night he told me a story from one of his trapping books, about a fox who was being hunted.

Apparently this fox climbed atop the back of a sheep and rode on it to safety, leaving behind no scent or tracks for the hunters and hounds to follow. Now me being an ‘adult’…completely took the bait and believed the story! How smart is that fox!?!

If you have seen the movie Fantastic Mr. Fox, you should believe this story too. (If you haven’t seen it, get to it! So good!) I couldn’t get that clever fox out of my head, real or not, it’s such a cute story. That night I had to draw a little visual for myself…


Today I was looking through my phone and saw this picture I took of my sketch. So I decided to make something that I could look at all the time and remember the fable.

Time to bust out the polymer clay again! Here is my little DIY clay figurine of the fox and sheep…a fun little project for kiddies or yourself--if you're an 'adult' like me!

To make the texture for the wooly sheep's body, I rolled the clay on the kitchen's textured wall.
I decided on a black faced sheep, they are my favorite! Poke holes for the legs, makes it easier to attach them.
I had to mix some clay to get the right color for my foxy.
This pic shows skoring. To make a strong bond between two pieces of clay, scratch both pieces where they are going to touch and then attach them.
They are ready to bake @ 250 degrees for 15 minutes.
I made some grass for them to bound upon, trees would be fun in the background too!
Here they are, baked and glued to the wire and ready to escape the hounds!

Now I can always remember this foxy fable, true or not...it's still a fun story!

Thursday, January 5, 2012

Some new twists & ties!

Okay, I’m obsessed. I love scarves. I love wearing scarves, I love tying scarves, I love shopping for scarves. I’m always looking for new ways to wear those lovely pieces of silk, cotton and cashmere. While I was browsing my favorite store in the entire universe, Anthropologie, I noticed how awesome their product pictures were for the scarves. So I decided to compile a pictorial list of my favorite ties to share with you…enjoy!


I can't wait to try these! I hope they help you out if you're ever in a scarf tying bind.
You can find all of these scarves at http://www.anthropologie.com/

Monday, December 5, 2011

Tis the season for crafting

As Christmas approaches, it brings with it mixed joys and stresses. Like the stress of untangling lights, and the joyful sight of a perfectly decorated mantle, with a nativity set and stockings. Like the stress of swallowing flocking while moving a tree, and the joy of plugging in the gently twinkling lights that you almost killed yourself hanging up along the gutter.

Also, the stress of getting your family all together at one time to snap a quick photo for your Christmas card, and the joy of getting them printed on time and in the mailbox. I think the joys outweigh the stresses!

Now speaking of Christmas cards, and the joy of sending them, there is also joy in receiving them! People work hard on those cards and you should display them in recognition! Ooh, what’s that? You just plaster them on your fridge? Well, I can help with that.

Since Christmas is indeed the season for crafting, here is a very simple and delightful DIY to display those festive Christmas cards you will be receiving this year. Plus once the holiday season has passed, you can use it for your other holiday displays, for pictures or an inspiration frame!

Now of course this DIY involves a bit of junkin'...those are the best kind, right? While I was out with my manfriend, I got this idea while looking through his grandparent's old house. So here are some instructions for your own holiday card display frame!

Ol' Duke helped me sand my window frame...by protecting me from my arch nemesis. The grasshopper! He jumped around and ate them while I worked. I am eternally grateful for his efforts, because once those suckers cling on to me I lose control...it's not pretty!

What a pal!

After you sand all the old paint and pokey corners off, you can paint or stain to your liking. While I was at work my nice sister spray painted mine black for me. Then I sanded the edges down and stained them to give it a vintage feel.


Here are the tools I used to make the hangers:


You can use whatever type of string or clips you want. These are just what I had laying around. Just screw the eye screws in by hand then string the line throughout the frame. Add as many clothesline pins as you want!


 And there you have it, a fun way to show off those Christmas cards...and a piece that you can leave up all year long! No one likes putting away all those decorations right?

Friday, November 18, 2011

Two birds with one stone...

As thanksgiving approaches I’ve started thinking of things I’m thankful for. (Thinking of things I’m thankful for…say that five times fast!) And I'm not trying to be sappy. Usually on Thanksgiving one of my aunts likes to play the “what are you thankful for game” and goes around the room and asks every single person, and I don’t want to be put on the spot. I like to be prepared. So really it’s like I’m getting ready for a pop quiz or something. But I’m glad she does it, because it gets me thinking about all the good things in my life and how blessed I truly am.

Now me, I am a very lucky person. Not only am I not allergic to dogs, but I can also whip up a cup of hot chocolate that makes me go into a happiness induced coma for at least a half hour. What else could I ask for? Especially during these cold winter nights that are starting to creep up. I also have unusually small feet for my height, which I constantly get ridiculed for because I get to wear elvish-small cute shoes. Yes, very lucky indeed.

But thinking about things more seriously, I have so many great things in my life! Especially my melting pot of friends. Now I don’t get to see them all the time, but when we do get together we can have a real hootenanny. I am really thankful for them, they are all those special kinds of friends, the ones that when you get together you just pick right up from where you left off. It's like we're back in high school...except some are just married or having kids haha!

It was recently one my friend’s birthdays…okay that was a fib. It was a while ago, and I am always behind on birthday presents! But last weekend I finally cleared off my “work station” (which constitutes as a folding card table smack dab in the middle of my already small bedroom) and got to work on my gift for E. Giving handmade presents is one of my favorite things to do, even if they might not know all the hard work you put into it, I still think it feels wonderful to make something with your own hands and to know that no one else will have the same gift that they are getting! Ooooh exciting and unique! And who doesn’t like unique?

I am in love with leather working and I want to share my project as a way to get others interested in the craft too! So here are some pics of my belt project and some tips on making your own belt…plus now my friend can see what work went into her birthday present! Two birds with one stone...


Get those ideas on paper...they usually turn into something cool!


The inspirations for the floral design...my pen holder at work.


I always start with the back of the belt, to make sure it's centered. (Don't forget to measure it out and put the buckle on the correct side...I learned that the hard way on my first belt...my buckle was on the men's side! It gets very annoying.)


I thought a saying would be a fun alternative to a name.


I didn't have enough room for the rolling hills in my drawing, but the stars and moon filled it in nicely.


On to the floral design...


I love free-handing my designs...I just keep adding to them until I'm satisfied...


I'm not a big fan of symmetry so I make the sides different...I like variety!


Thank you pen holder for the inspiration!


The tip of the belt is often forgotten about...I like to add design there since it's so visible. It's also a good place for personalization if you didn't use a name on the back.


And it's ready for some stain and embellishments!


After I stained it, I added some rhinestone rivets for an extra sparkle.


And a fancy buckle from Tandy Leather Factory.
(They have everything you need! http://www.tandyleatherfactory.com/)


This is a special case in which the project IS as easy as it looks. Leather working is a great hobby and once you start it's hard to stop, it's so much fun! There are endless possibilites to what you can make. I hope this gets you thinking about starting another hobby : )

Saturday, November 5, 2011

Winter is the Time for Home

As you can see from my blog banner, I am ready for snow. And Christmas. And of course Swedish meatballs. John-boy is ready too! Yes, I have finally named my mounted jackalope mascot! His name was inspired by a 70s Halloween theme from where I work. The Waltons anyone?

I’m doing it again…I’m skipping over Thanksgiving and going right to Christmas! But I had to change my banner, because I couldn’t wait to string lights on John-boy’s antlers haha…wow I’m sounding more like a crazy cat lady by the second. Or would it be crazy rabbit lady?

I also added fluffy, powder snow banks (just waiting to be torn up by a snowmobile) and a plump, jolly snowman. It is November now, so I’m allowed to be excited for snow and winter. And probably about two days into getting snow in my shoes and soaking my socks, scraping frost off my windows and spinning out on ice, I’ll most likely be begging for spring. But for now I will allow myself to be enthusiastic and dissuade anyone trying to ruin it for me!

Alright, I’m done (for now) with my snow rant. What I really want to talk about is “welcome stars”. Is your neck getting a little sore from the whiplash it’s receiving from my random subjects? Well sorry about that, I will explain.

A couple months ago I went to the Høstfest in Minot, ND. It was my first time going and I had no idea it would have such an impact on me. Little things just keep popping up in my mind…some good (welcome stars for example) and some bad…like the giant creepy tree nymph with the huge eyes that I had to stand by to take a picture…I just got goosebumps again… but besides the people running about in costumes, the event was pretty spectacular. There were people from all over, I even sat next to a couple from Norway and got to listen to their magical accent. Score!


There were all different types of booths, with all different types of crafts and items to buy. One of the booths told the story of welcome stars. Of how people in Norway would hang these stars in their window in the winter to show others a sign of welcome, and to come visit their house. Aww yes, winter is the season for gatherings, good food and playing cards. AND SNOW! Surely, winter is the time for home.

Well, that story has stuck with me and I have been kicking myself for not purchasing one of those star lights. So when I was out hunting with my brother and manfriend the other day, and I spotted a few pieces of old tin...I had to have them! Of course my manfriend was wonderful enough to climb up and take them down for me off of the old building. “I just don’t know why you’d want that," said my baffled manfriend...

But I knew why! How exciting! I could make a welcome star and just in time for the first snow fall too. So here are my instructions for your very own homemade welcome star...


Start out by cutting a star stencil that fits your piece of tin, then trace with a white colored pencil.


Cut out your two stars. I used a scissors made for metal cutting, but clipping shears usually do just as well!


It helps to file the edges, they get a little sharp in some places after cutting.


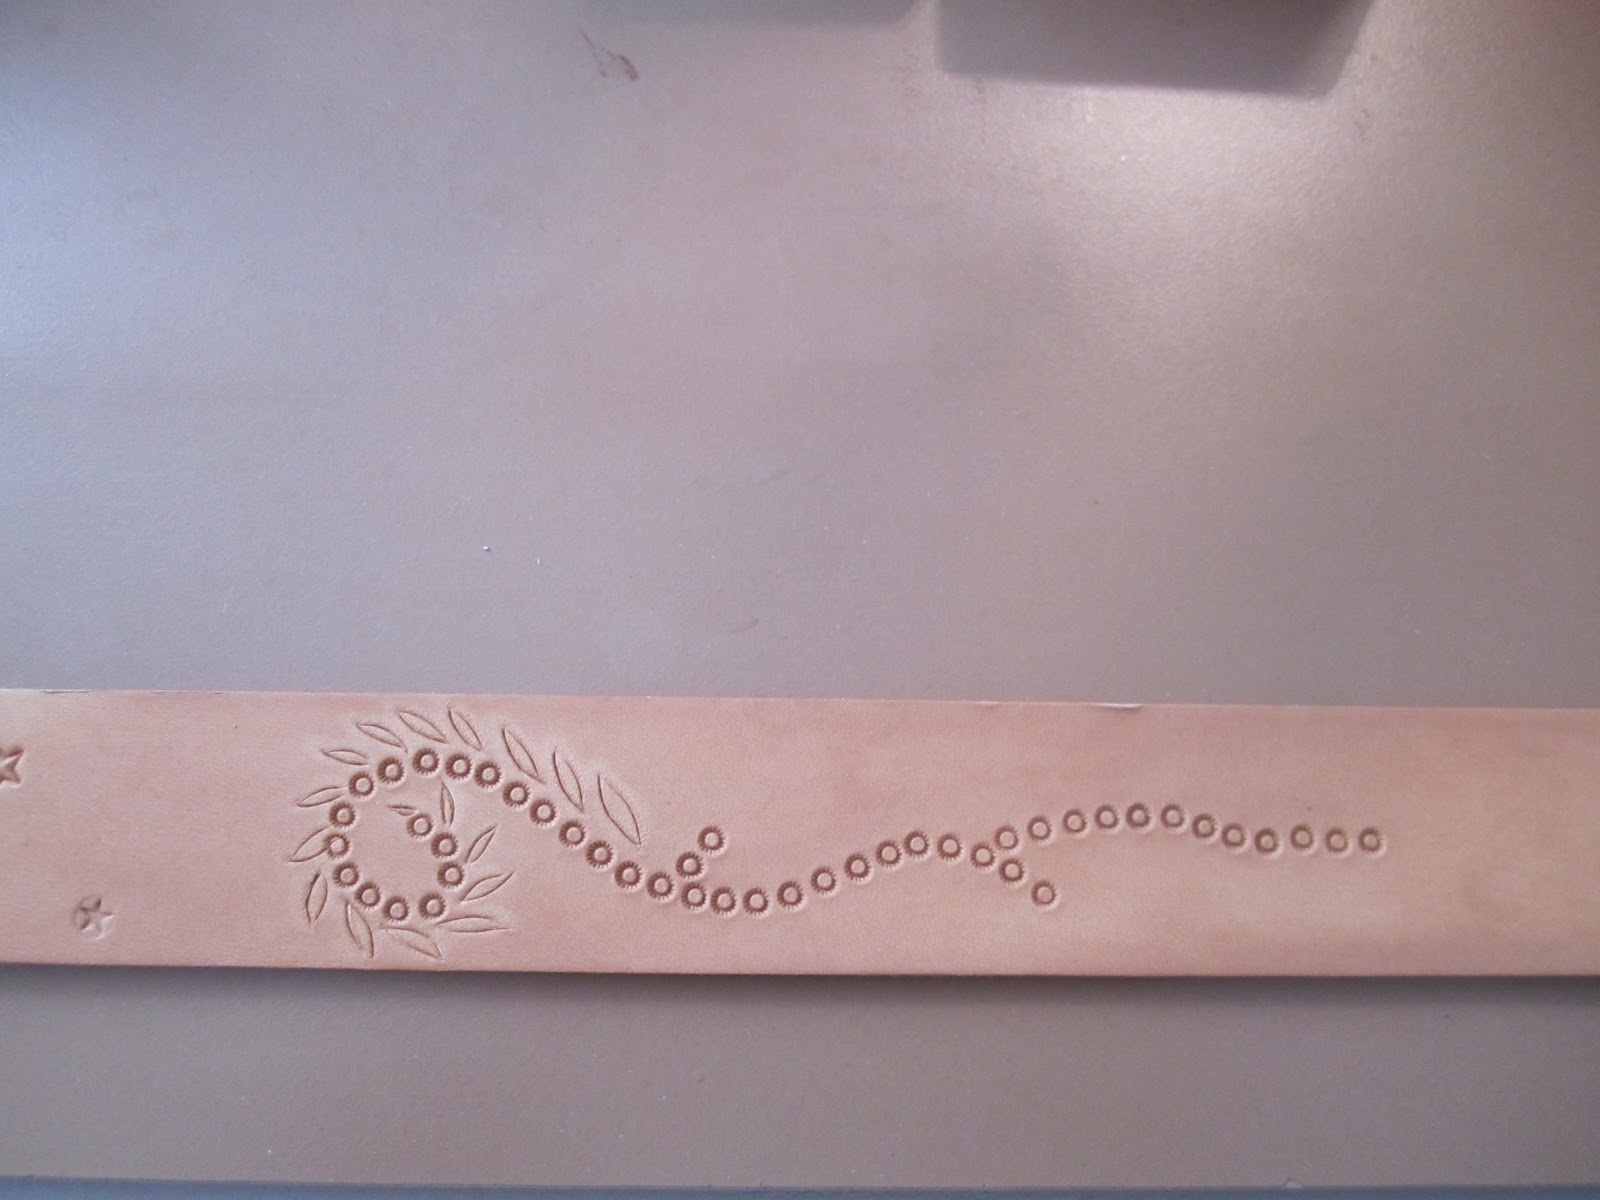
Draw out any design you want that suits your fancy!


I would usually just set this on the ground to punch but it was too cold out! So I used this wood block and it worked really well.


I used a screw (couldn't find a decent sized nail!) and an old leather swivel knife to make the punches.


Once you have everything punched, it's time to fold your stars! You'll probably need gloves because the backs of the holes are very pointy. You can use any square edge to bend the tin over.


Then you can tie the two sides together with wire or cord.


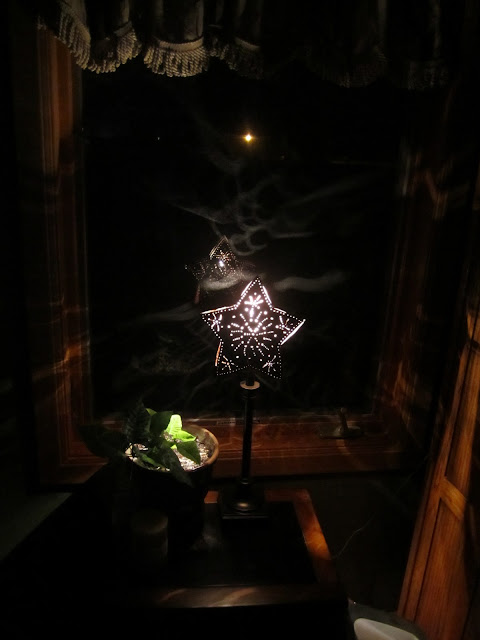
You can either use a hanging light kit for your star or use it as a lamp shade.


And there you have it! Your star is ready to welcome all your friends and family.


Friday, November 4, 2011

The end of my story...

Yes it’s finally finished! I stayed up the last few nights and wouldn’t allow myself to eat until I completed my neck warmer. Just kidding, (like I could go without food!) I knew it would take me a while to finish it and I’m pretty happy with the result, beings I’m a “shoddy” knitter and all. Now we just need some snow and I will be able to wear it!


So here is the end of my MT road trip story:


It's just a regular stitch (I don't know any other ones yet!) and after I casted off, I weaved the turquoise leather strip through and tied the ends. Simple!


Nice and cozy! And easy. (That's what I like!)

Tuesday, October 18, 2011

My Craft Wheels are a Turnin'

I notice when the weather starts getting colder and things slow down a bit, I get to thinking. This is not as scary as it sounds…I get to thinking about more and more projects that I have stored away in my mind for a less busy time. So now that the evenings are quite chilly and I’m spending more time inside, the project generator in my mind starts it’s engine and gets me revved up for crafts. Maybe this is why I enjoy fall and winter so much?

I’m lucky to have a manfriend that will help me with these projects. Like finding me old barn doors and tearing down old window frames and drilling “pocket holes”…yes, I have learned a lot. He doesn’t really understand why I get so excited and do my happy dance for old tin and wood…"It has a history!” or “That chipping paint gives it character!”… but he obliges and helps me with the tasks.

So this last weekend on a chilly Saturday, I cornered my Far and persuaded him to dig out one of my Mor’s salvaged pieces of ceiling tin that I was confiscating to use for this project. And after some giant spider encounters, a few cut fingers and some choice words, he had it out of the little brown building and even cut it for me! (What a great Far!)

“This is finally happening!” I shouted…in my head of course…maybe…Then I scooped up some old wood from my growing collection and I was off to the big shop on manfriend’s farm to create something magical…

Well…

Are you wondering what in the begeezus I made? And did it turn out? Here is your answer…and some steps in creating your own tin magnet board...you know--if things like this make you do your happy dance too:

Supplies:
One square of old tin
3-4 pieces of old wood (I used old window trim)
Compound Saw (or something to cut the wood)
Pocket Hole Jig (this is an option)
Electric Screwdriver
Screws
Wood Glue
3/4 Inch Nails
Hammer

To begin, decide how you want your tin to look. If you want it painted or just the metal showing. I went for the metal look. (After manfriend tried everything under the sun to get the old paint off of the front, we just used the back side of the tin for the magnet board…I’m allowed to change my mind right? Oops.) From here on out I basically just watched him go to town. My shop skills have dwindled since high school…but I did learn some things!


Decide how you want to cut your frame…if you want straight seams or angled at the corners. Then measure and cut away! (He did straight seams with a one inch overhang on the tin.) Once your boards are cut you can drill pocket holes or screw them together any way you want. Make sure to glue the seams right before you screw the frame together because “90% of your strength comes from the glue” stated manfriend…or something like that…


Once your sturdy frame is assembled, place your tin on the back and hammer the sides on with the 3/4 inch nails. (If you have thin frame wood, make sure your nails aren’t too long that they’ll go through the front.)


And Waaaah Laaa! You have your tin magnet board! You can also put a hanger on the back if you plan on hanging the board. But it would work to set somewhere too. So overall it doesn’t sound too bad does it? Just don’t spend all your time trying to get old paint off and it will be a quick and fun project for one of your chilly fall evenings!


And then you can go on to create some pretty magnets for your board...another fun project! (I bought those flowers at Hobby Lobby--aka Heaven--and glued magnets on the back.) I hope this gets your craft wheels a turning!


Related Posts Plugin for WordPress, Blogger...