Showing posts with label old tin projects. Show all posts

Saturday, November 5, 2011

Winter is the Time for Home

As you can see from my blog banner, I am ready for snow. And Christmas. And of course Swedish meatballs. John-boy is ready too! Yes, I have finally named my mounted jackalope mascot! His name was inspired by a 70s Halloween theme from where I work. The Waltons anyone?

I’m doing it again…I’m skipping over Thanksgiving and going right to Christmas! But I had to change my banner, because I couldn’t wait to string lights on John-boy’s antlers haha…wow I’m sounding more like a crazy cat lady by the second. Or would it be crazy rabbit lady?

I also added fluffy, powder snow banks (just waiting to be torn up by a snowmobile) and a plump, jolly snowman. It is November now, so I’m allowed to be excited for snow and winter. And probably about two days into getting snow in my shoes and soaking my socks, scraping frost off my windows and spinning out on ice, I’ll most likely be begging for spring. But for now I will allow myself to be enthusiastic and dissuade anyone trying to ruin it for me!

Alright, I’m done (for now) with my snow rant. What I really want to talk about is “welcome stars”. Is your neck getting a little sore from the whiplash it’s receiving from my random subjects? Well sorry about that, I will explain.

A couple months ago I went to the Høstfest in Minot, ND. It was my first time going and I had no idea it would have such an impact on me. Little things just keep popping up in my mind…some good (welcome stars for example) and some bad…like the giant creepy tree nymph with the huge eyes that I had to stand by to take a picture…I just got goosebumps again… but besides the people running about in costumes, the event was pretty spectacular. There were people from all over, I even sat next to a couple from Norway and got to listen to their magical accent. Score!


There were all different types of booths, with all different types of crafts and items to buy. One of the booths told the story of welcome stars. Of how people in Norway would hang these stars in their window in the winter to show others a sign of welcome, and to come visit their house. Aww yes, winter is the season for gatherings, good food and playing cards. AND SNOW! Surely, winter is the time for home.

Well, that story has stuck with me and I have been kicking myself for not purchasing one of those star lights. So when I was out hunting with my brother and manfriend the other day, and I spotted a few pieces of old tin...I had to have them! Of course my manfriend was wonderful enough to climb up and take them down for me off of the old building. “I just don’t know why you’d want that," said my baffled manfriend...

But I knew why! How exciting! I could make a welcome star and just in time for the first snow fall too. So here are my instructions for your very own homemade welcome star...


Start out by cutting a star stencil that fits your piece of tin, then trace with a white colored pencil.


Cut out your two stars. I used a scissors made for metal cutting, but clipping shears usually do just as well!


It helps to file the edges, they get a little sharp in some places after cutting.


Draw out any design you want that suits your fancy!


I would usually just set this on the ground to punch but it was too cold out! So I used this wood block and it worked really well.


I used a screw (couldn't find a decent sized nail!) and an old leather swivel knife to make the punches.


Once you have everything punched, it's time to fold your stars! You'll probably need gloves because the backs of the holes are very pointy. You can use any square edge to bend the tin over.


Then you can tie the two sides together with wire or cord.


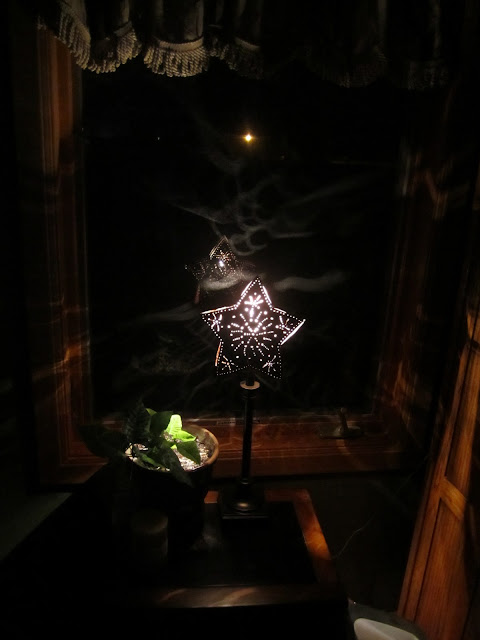
You can either use a hanging light kit for your star or use it as a lamp shade.


And there you have it! Your star is ready to welcome all your friends and family.


Tuesday, October 18, 2011

My Craft Wheels are a Turnin'

I notice when the weather starts getting colder and things slow down a bit, I get to thinking. This is not as scary as it sounds…I get to thinking about more and more projects that I have stored away in my mind for a less busy time. So now that the evenings are quite chilly and I’m spending more time inside, the project generator in my mind starts it’s engine and gets me revved up for crafts. Maybe this is why I enjoy fall and winter so much?

I’m lucky to have a manfriend that will help me with these projects. Like finding me old barn doors and tearing down old window frames and drilling “pocket holes”…yes, I have learned a lot. He doesn’t really understand why I get so excited and do my happy dance for old tin and wood…"It has a history!” or “That chipping paint gives it character!”… but he obliges and helps me with the tasks.

So this last weekend on a chilly Saturday, I cornered my Far and persuaded him to dig out one of my Mor’s salvaged pieces of ceiling tin that I was confiscating to use for this project. And after some giant spider encounters, a few cut fingers and some choice words, he had it out of the little brown building and even cut it for me! (What a great Far!)

“This is finally happening!” I shouted…in my head of course…maybe…Then I scooped up some old wood from my growing collection and I was off to the big shop on manfriend’s farm to create something magical…

Well…

Are you wondering what in the begeezus I made? And did it turn out? Here is your answer…and some steps in creating your own tin magnet board...you know--if things like this make you do your happy dance too:

Supplies:
One square of old tin
3-4 pieces of old wood (I used old window trim)
Compound Saw (or something to cut the wood)
Pocket Hole Jig (this is an option)
Electric Screwdriver
Screws
Wood Glue
3/4 Inch Nails
Hammer

To begin, decide how you want your tin to look. If you want it painted or just the metal showing. I went for the metal look. (After manfriend tried everything under the sun to get the old paint off of the front, we just used the back side of the tin for the magnet board…I’m allowed to change my mind right? Oops.) From here on out I basically just watched him go to town. My shop skills have dwindled since high school…but I did learn some things!


Decide how you want to cut your frame…if you want straight seams or angled at the corners. Then measure and cut away! (He did straight seams with a one inch overhang on the tin.) Once your boards are cut you can drill pocket holes or screw them together any way you want. Make sure to glue the seams right before you screw the frame together because “90% of your strength comes from the glue” stated manfriend…or something like that…


Once your sturdy frame is assembled, place your tin on the back and hammer the sides on with the 3/4 inch nails. (If you have thin frame wood, make sure your nails aren’t too long that they’ll go through the front.)


And Waaaah Laaa! You have your tin magnet board! You can also put a hanger on the back if you plan on hanging the board. But it would work to set somewhere too. So overall it doesn’t sound too bad does it? Just don’t spend all your time trying to get old paint off and it will be a quick and fun project for one of your chilly fall evenings!


And then you can go on to create some pretty magnets for your board...another fun project! (I bought those flowers at Hobby Lobby--aka Heaven--and glued magnets on the back.) I hope this gets your craft wheels a turning!


Related Posts Plugin for WordPress, Blogger...